Product tours have become an effective method for improving user onboarding and product adoption. By integrating visual instructions with interactive components, they offer an engaging and immersive learning experience that aids users in understanding your product value. Our internal research shows that product tours and other product activation tools in our stack can double your trial conversion rate, increase your NPS by 15%, and cut your user onboarding costs by 32%!
This guide is for product managers who are looking for best practices and practical tips for creating and using successful product tours.
Do you already use tours for your product? If not, try Product Fruits 🍇 with a 14-day free trial and see how our product tours work.
Product Tour Definition
Let’s quickly recall what product tours are.
A product tour is a step-by-step process of your product that enables users to learn by doing things at their own pace. Rather than onboarding users with a single information overload, like a manual or video, a product tour educates them as they actively use each feature.
Have a look at the product tour example from Adzooma, who is our customer.

Most users enjoy exploring products quickly and appreciate the option to replay the tour if they forget how to use some features. This approach boosts product adoption and user engagement. Effective interactive product tours highlight key activation events, ideally limiting them to five, four, or even fewer.
Best practices for creating and using product tours
We’ve compiled advice based on thousands of tours created by our customers, industry learnings, and our experience using Product Fruits 🍇. This is your ultimate checklist for creating and using product tours successfully. ⤵️
- Product Tour Definition
- Best practices for creating and using product tours
- Best Practice #1: Stick to the right goal
- Best Practice #2: Draft your flow before building the tour
- Best Practice #3: Follow the best practice framework
- Best Practice #4: Make your product tours interactive
- Best Practice #5: Integrate tours with other onboarding elements to achieve full potential
- Best Practice #6: Keep your product tours short and sweet
- Best Practice #7: Indicate how long your tour takes
- Best Practice #8: Trigger product tours from onboarding checklists, hints, or other onboarding elements
- Best Practice #9: Avoid starting user onboarding with complex features
- Best Practice #10: Iterate tours through user feedback
- Best Practice #11: Iterate tours through A/B testing
- Best Practice #12: Create dedicated feature tours for complex or confusing product parts
- Best Practice #13: Generate tours from scratch with AI
- Best Practice #14: Plug AI to improve microcopy
- Best Practice #15: Give the option to replay the tour
- Best Practice #16: Personalize product tours through segmentation
- Takeaway 🍇
Best Practice #1: Stick to the right goal
There are various jobs to be done and purposes that define how the product tour should be organized. It all starts with the use case you are addressing with the tour. It can be:
- new user onboarding
- guiding existing users through a redesign
- guiding existing users through a new feature
- Introducing forgotten or underused feature
Another consideration and a layer you need to apply here is whether you want to:
- Increase the overall product activation
- increase the activation of a specific feature
- reduce user onboarding time
- grow user engagement
- etc
Having these things clearly articulated before you start working on creating your product tour will help you stay focused on the right angle and build a relevant flow and narrative that addresses its goals more efficiently.
Best Practice #2: Draft your flow before building the tour
Start work by drafting your product tour flow. Whether you use software such as Figma or pen and paper, the key is to visualize each step in detail. Take time to think through the user journey, envisioning how users will interact with your dashboard. By mapping out the entire process, you can identify critical steps to include in your tour and reveal any potential bottlenecks.

Then, discussing your draft with team members or stakeholders can provide valuable feedback and insights, helping you to refine your product tour even further.
Best Practice #3: Follow the best practice framework
Step 1: Goal setting — Define clear objectives for your product tour to ensure it aligns with your overall user engagement and onboarding strategy.
Step 2: Create a draft — Draft your product tour flow. Regardless of the tool you choose – it can be as simple as pen and paper – visualizing all the steps will help ensure you’ve covered everything.
Step 3: Build on staging—Once your draft is ready, move it into the staging of a suitable product tour software. Use Product Fruits to bring your tour to life.
Step 4: Testing & feedback—When all elements are set, and the prototype looks good, share it with the team to proceed to the testing and QA stage.
Step 5: Production release — Implement team feedback and only then release it to production!
Step 6: Measure Results — Based on the goal you set at the beginning, use relevant KPIs to measure the results of your product tour and see if your goal is being met.
Step 7: Iterate — You can still make changes on the fly whenever you get user feedback or if AB testing shows better performance.
Best Practice #4: Make your product tours interactive
Design your tours to make them engaging. Include various action points in your flow to excite users about your product.
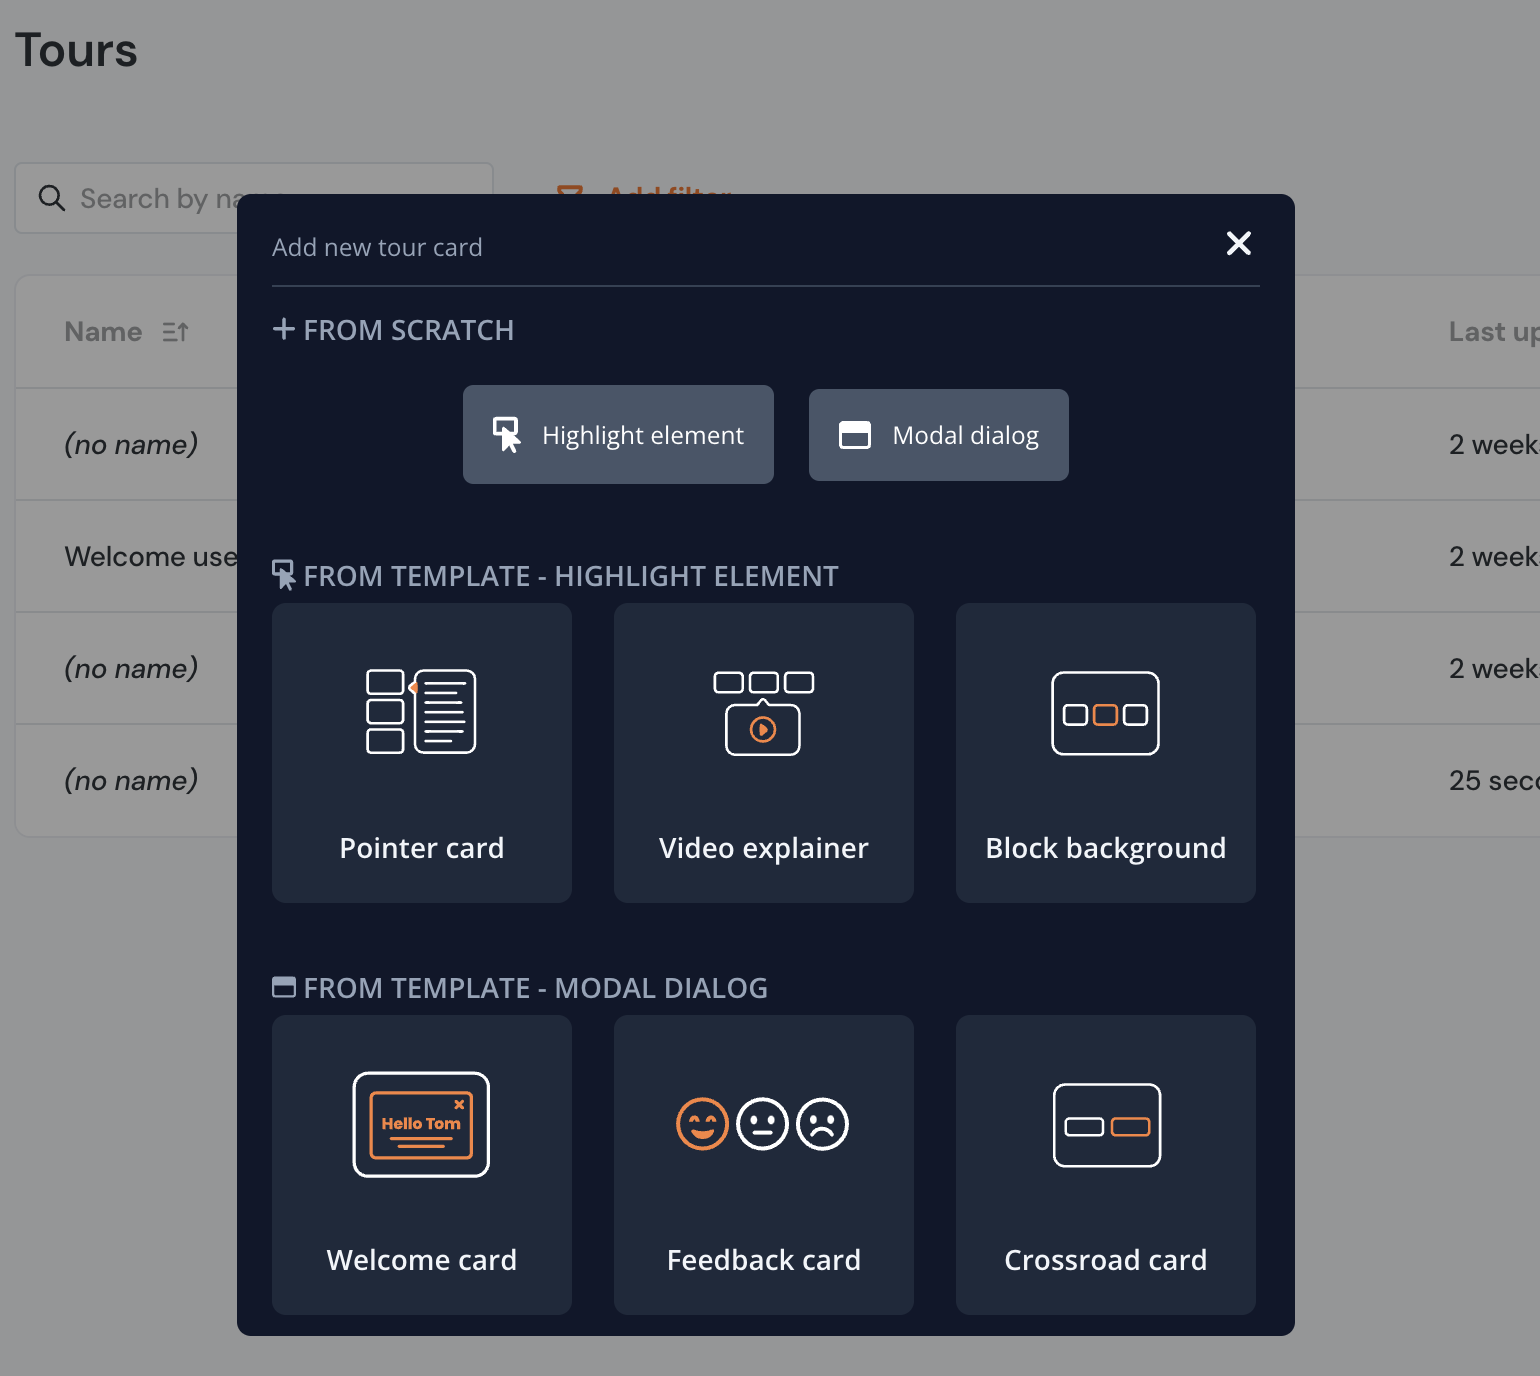
In Product Fruits 🍇, there are 6 different element types you can use when designing your product tour to make the flow interactive and versatile. Blend them for the best engagement results.
A good flow typically starts with a welcome card to introduce your tour. Then you might want to close it in three different ways:
- Simply finish to give users room for self-practice 🤞🏻.
- end with a feedback card to gather qualitative insights and understand if the tour was satisfactory.
- Show a crossroad card that allows users to choose one of three options for following directions that interest them most for further touring.
In between, mix videos, pointer cards, and block backgrounds to allow users to fully activate, watch, and play with your stack. Interactivity will ensure users smoothly progress towards the AHA moment.
Best Practice #5: Integrate tours with other onboarding elements to achieve full potential
Product tours are incredibly helpful on their own. They provide users with guided experiences that can significantly enhance their understanding and use of your product.
Supporting them with complementary solutions such as interactive hints, surveys to gather user feedback, comprehensive onboarding checklists, and the life ring button can double or even triple product adoption results.
For instance, hints provide contextual help by offering additional information as users self-explore a platform.
You can enhance the user experience by linking a tour to a hint. Look at the example below to see how Adzooma does that:

This approach lets you provide basic information through hints and lets users start a more detailed tour from the hint icon or a custom button.
Learn how to blend product tours with hints for the best results from this blog post: Maximize your user onboarding: combine tours and hints.
Best Practice #6: Keep your product tours short and sweet
Don’t overload your users with 20-step tour cards, as this won’t help with information delivery and might discourage them from retaking the tour. Instead of never-ending tours, divide the information flow into shorter, 5-7-step tours using highlighted elements to bring your users to a quick aha moment.
Users tend to cancel product tours that are too long. Look at the chart developed by our team, which shows the ratio of users reaching the last card of the tour. ⤵️
For tours of 2-6 cards, 33.05% of users reach the final card, the highest percentage among any group. For instance, for tours of 7-11 cards, the percentage drops by more than 50%!

The chart shows the percentage of users who reach the last card of the product tour:
- For a tour of 2-6 cards, it’s 33.05%
- For a tour of 7-11 cards, it’s 14.93%
- For a tour of 12-16 cards, it’s 9.63%
- For a tour of 17-21 cards, it’s 13.98%
- For a tour of 22-26 cards, it’s 4.65%
Best Practice #7: Indicate how long your tour takes
Tour completion rate depends on many factors. It’s not just about when you show your product tours or how many cards they have. It’s also about clearly communicating how long it will take to complete the tour. To motivate users to take the tour, highlight the completion time on your welcome card.
Take a look at an example of a Keboola demo project tour, where this best practice is nicely implemented.

Best Practice #8: Trigger product tours from onboarding checklists, hints, or other onboarding elements
Unlike standalone welcome tours, which typically open when the user enters your product or app, we recommend launching product or feature tours when the user is ready and wants to learn more from other onboarding elements.
What does that mean? Whether you have a product tour to show users your platform or want to set a feature tour to promote important or new sections, let users trigger this step-by-step tour from a welcome tour card, hint, onboarding checklist, in-app announcement, life ring button, etc.
Look at the example below from Flown, one of our customers, and see how they trigger a tour from the user onboarding checklist.

Standalone product tours will not resolve your onboarding challenges. You need to introduce the educational tour to your users and explain its benefits when necessary and when contextually relevant.
As educational content, tours work well within other onboarding elements (tour card button, checklist, help center, etc.). This ensures your users have a smooth and comprehensive experience.
Best Practice #9: Avoid starting user onboarding with complex features
The purpose of the initial onboarding is to welcome customers, explain the product’s value, and lead them to the next steps. These steps can include launching instructions in the onboarding checklist or a product tour around the platform triggered from the welcome tour.
Bear in mind that new users have just arrived in your app, and you want to assure them that they are in the right place and that you know how to solve their problems.
A typical welcome tour setup includes a few cards. Many of our clients opt for one card with a CTA button to launch the introductory video, tour around the platform, or instructions in the onboarding checklist.
When onboarding new users to your product, aim to simplify their experience. Avoid including complicated features in your welcome tours, as feature tours are more technical.
Best Practice #10: Iterate tours through user feedback
💡Customer feedback loop is a strategy for constant product improvement based on users’ opinions and suggestions.
Use in-app surveys to identify which features or tools your users find problematic and what obstacles they encounter in your UX. Listen to this feedback and consider it while planning your product tours. Besides communicating product overview and changes, use product tours to clear up confusion and explain features.
To close the feedback circle, trigger post-tour surveys to see how users evaluate the tour experience. This will tell you if users encounter friction when launching the tour and help you optimize it for higher tour completion rates.
For that, you can finalize your tour with a Feedback card in Product Fruits:

Read more about the survey types and how to use them from this post Different Survey Types and When to Use Them.
Best Practice #11: Iterate tours through A/B testing
When creating content and flows for product tours, you might need clarification about which version will resonate better with your audience. One effective strategy is to use A/B testing, which allows you to compare different versions.
By observing metrics such as the tour completion rate versus the tour skip rate, you can gather valuable insights into which version is more engaging and user-friendly.
You can use Product Fruits to introduce AB testing by showing different versions of your content to users. Our segmentation feature allows content to be conditionally displayed. Read more about this in the post A/B testing via external tools.
Alternatively, jump right into Product Fruits 🍇 and see how it works in practice with a free 14-day trial.
Best Practice #12: Create dedicated feature tours for complex or confusing product parts
Identify specific areas in your application that often confuse users or raise questions. You can do it through in-app surveys. Then to enhance the user experience, consider adding helpful hints and brief feature tours directly into the user interface.
Additionally, use in-product analytics to monitor how users interact with these elements. By analyzing this data, you can gain insights into which aspects are most effective and make necessary adjustments to improve clarity and usability further.
Discover how to launch features from these articles 6 Ways to Introduce a New Feature and Drive Product Adoption and The Ultimate Feature Launch Checklist.
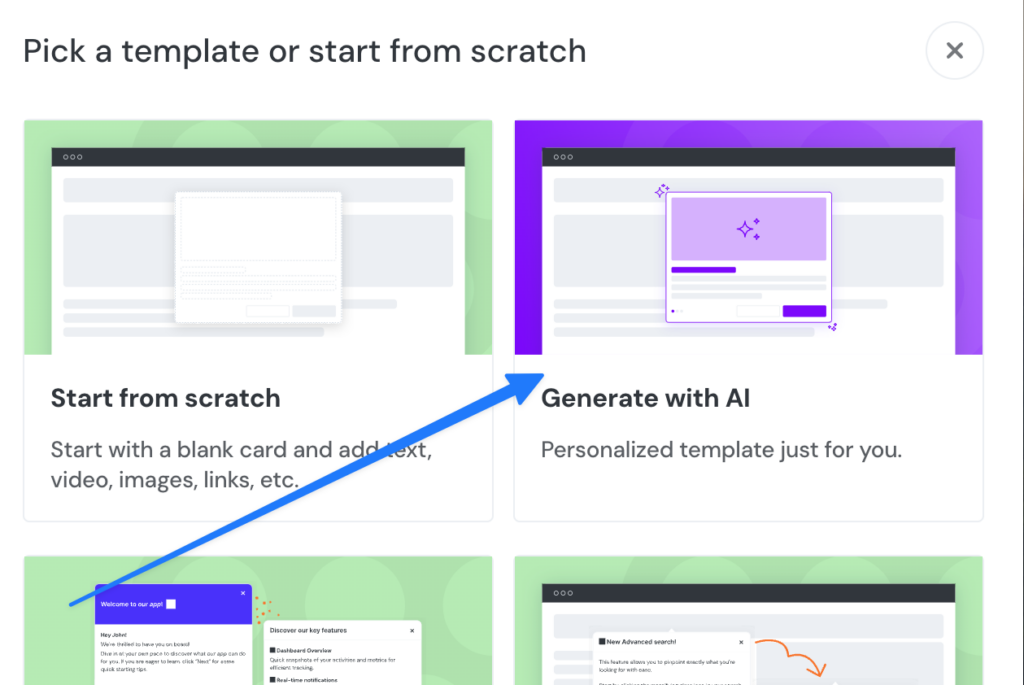
Best Practice #13: Generate tours from scratch with AI
When collecting user feedback, we often hear that users experience writer’s block when creating a new product tour from scratch. We get it. You might find yourself stuck even if you’ve researched, understood the user journey, and know precisely how to build the proper tour flow.
At Product Fruits, we solved this for you, and today we can present you with an AI-powered user onboarding. Product Fruits AI automatically generates tours for you. Launch them for your users with just one click, or tailor them to your preferences.
It takes to pick the suitable template, “Generate with AI,” and then follow the clear steps to see your product tour generated. Once you have it, you can perfect it.
Does this spark your curiosity and make you want to explore further?
Watch the AI-explainer video to dig deeper into the topic, or try yourself in Product Fruits🍇 with a 14-day free trial.
Best Practice #14: Plug AI to improve microcopy
Apart from designing the entire product tour flow with AI, you can use our AI writer to improve the microcopy on specific cards. This helps make the text sound better, avoid grammar errors, shorten it to fit the card, and test other options.

This is how AI text assistant looks in Product Fruits.
Depending on the context, you can trigger tours with custom rules such as user details, events that have or haven’t happened, etc. Alternatively, you can use the tagging feature to assign specific tours to focus user groups.
Best Practice #15: Give the option to replay the tour
Users might skip your tour the first time because they are focused on using your product for work and often short on time. They might not have the patience or bandwidth to engage with a tour immediately. We’ve measured a ~40% drop-off skip rate by the first step.
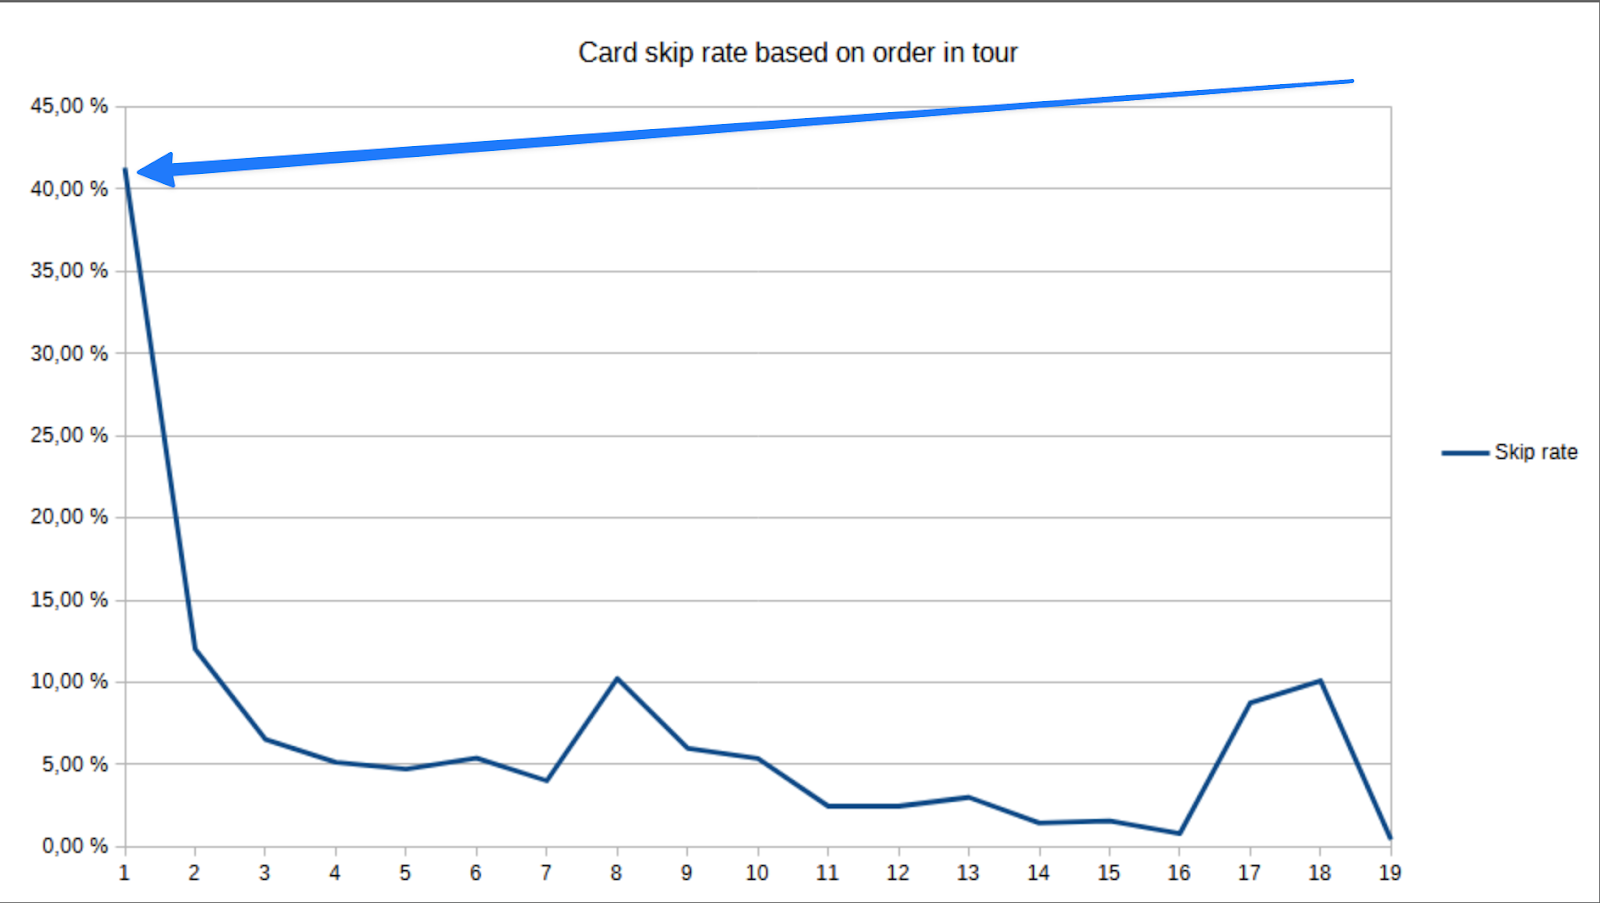
So, they might cancel even if they are genuinely curious about the functionalities. For this reason, it’s a good practice to allow them to reopen the tour at their convenience.
The life ring button is the perfect tool for keeping your product tours visible to users, so they can launch it and walk through them at the right time.
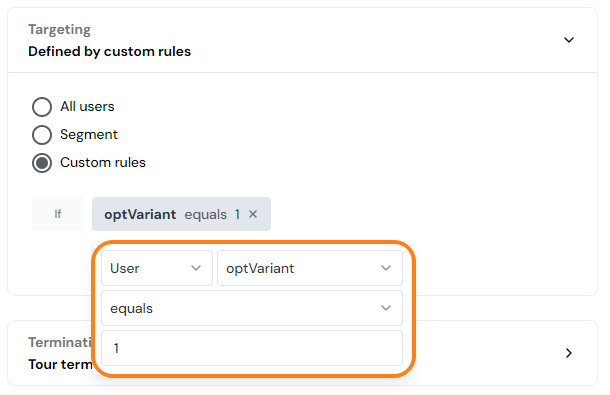
Best Practice #16: Personalize product tours through segmentation
Imagine your product tour as a custom guide that caters to each user’s specific needs. It’s not a one-size-fits-all approach—it’s about providing a perfect fit. Segment your tours based on user roles or behaviors. This way, a new user receives a welcome tour, while an experienced user gets advanced tips. It’s like having a personal assistant who understands precisely what they need.
In Product Fruits 🍇, there are multiple ways to show different tours to various classes of users.

Takeaway 🍇
Always keep the user journey in mind and go through product tours yourself. Pay attention to how many learning elements you have because it’s easy to overdo it. Product tours are meant to increase engagement but sometimes lead to frustration. Users need guidance. So the problem isn’t product tours—they’re poorly designed ones. This is why we created this best practices guide.
At Produce Fruits, we have many user onboarding tools in our toolkit. The best way to see what tool stack suits your product is to try them out on a free 14-day trial.
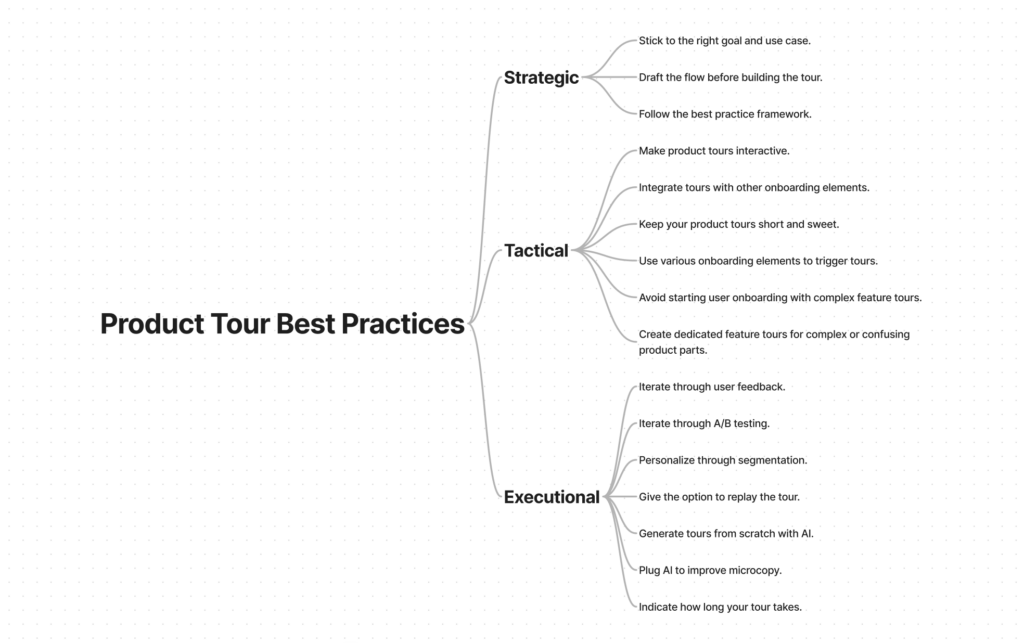
BONUS: Below, find a comprehensive cheat sheet ⤵️ to help set up an effective product tour. It includes all the best practices we’ve discussed. Feel free to save it on your desktop and use it as a visual guide whenever needed.